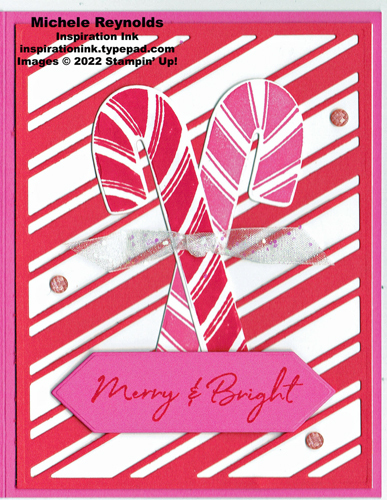
P layful Christmas card made with Stampin' Up! products.
Project Recipe
Cut cardstock pieces to the following sizes using a Paper Trimmer:
- card from Polished Pink Cardstock at 5-1/2" x 8-1/2" and scored at 4-1/4"
- 4" x 5-1/4" from Basic White Cardstock
- 4" x 5-1/4" from Sweet Sorbet Cardstock
- 3-1/2" x 4-1/4" from Basic White Cardstock
- 1-1/4" x 3-3/4" from Polished Pink Cardstock
Pick out the large stripes die from the Candy Canes Dies. Put it on top of the Sweet Sorbet rectangle on a platform on your Stampin' Cut & Emboss Machine. Run through the machine.
Use Multipurpose Liquid Glue or Fine-Tip Glue Pen to adhere the striped Sweet Sorbet rectangle cut out to the 4" x 5-1/4" white rectangle so the edges are even.
Adhere the white/red striped rectangle to the front of the Polished Pink card.
Mount one of the candy cane images from the Sweet Candy Canes Set (it doesn't matter which) on Block H. Ink it up with the Polished Pink Ink Pad. Stamp it on one side of the 3-1/2" x 4" white rectangle leaving room to cut it out.
Mount the other candy cane image from the Sweet Candy Canes Set on Block H. Ink it up with the Sweet Sorbet Ink Pad. Stamp it on the other side of the white rectangle next to the previously stamped candy cane. Leave room to cut it out.
Pick out both candy cane dies from the Candy Canes Dies. Put them on top of the stamped candy cane images on a platform on your Stampin' Cut & Emboss Machine so the images are centered in the dies. Make sure the dies do NOT overlap. Run through the machine.
Adhere the candy cane cut outs to the center of the card front as shown so they criss-cross each other and the pink candy cane is on the bottom and the tops of the canes are about 7/8" from the top of the card.
Mount the "merry & bright" sentiment from the Sweet Candy Canes Set on Block H. Ink it up with the Sweet Sorbet Ink Pad. Stamp it in the center of the Polished Pink rectangle.
Pick out the larger, pointy-end label die from the Lighthouse Dies. Put it on top of the stamped sentiment on a platform on your Stampin' Cut & Emboss Machine so the sentiment is centered in the die. Run through the machine.
Use Stampin' Dimensionals to adhere the sentiment label cut out to the front of the card so it is centered side to side, covers the bottoms of the candy canes, and is about 3/4" from the bottom of the card.
Cut a 3" piece of the White 3/8" Glittered Organdy Ribbon.
Tie a half-knot in the center of the ribbon and trim the ends.
Use a Mini Glue Dot to adhere the ribbon knot to the front of the card in the center of the candy canes where they cross.
Use the mini spatula on the Take Your Pick to carefully peel up three large Calypso Coral gems from a sheet of Fine Sparkle Adhesive-Backed Gems making sure that you get the adhesive backings as well. Adhere them randomly to the front of the card around the candy canes and sentiment label.

