|
Michele Reynolds
http://inspirationink.typepad.com/inspiration-ink/ michelerey@aol.com |
Tags To Go Life's Detours |
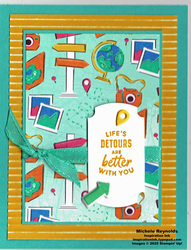
F un card perfect for lots of occasions using Stampin' Up! products.
Supplies needed:
Project Recipe:
-
Cut cardstock and designer paper pieces to the following sizes using a Paper Trimmer:
- card from Summer Splash Cardstock at 5-1/2" x 8-1/2" and scored at 4-1/4"
- 3-3/4" x 5" from Crushed Curry Two-Tone Cardstock
- 3-1/8" x 4-3/8" from Summer Splash Cardstock
- 3" x 4-1/4" of various travel items on light blue background design from On The Go 12" x 12" Designer Series Paper, cut so the items are vertical on the vertical rectangle
- 1-3/4" x 3-1/4" from Basic White Cardstock -
Insert the Crushed Curry Two-Tone rectangle into the Mini Corrugated 3D Embossing Folder so the darker side of the cardstock is face up and you can read the logo on the front flap of the folder. Use the line printed on the front flap of the folder to make sure it is lined up straight. Place the folder with the cardstock inside on the platform on your Stampin' Cut & Emboss Machine and run through the machine.
-
Gently rub a sanding block or sandpaper across the dry embossed rectangle to make the white core show through in some places.
-
Adhere the dry embossed and sanded Crushed Curry rectangle to the front of the Summer Splash card so it is centered.
-
Adhere the piece of On The Go Designer Paper to the center of the Summer Splash rectangle.
-
Cut a 3-3/4" piece of the Summer Splash 3/8" Bordered Ribbon.
-
Lay the ribbon across the matted designer paper rectangle so it is about 1-1/2" from the bottom. Fold the ends of the ribbon over and secure the ribbon in place on the back with strips of Tear & Tape Adhesive.
-
Remove the protective backings from the Tear & Tape pieces and add Stampin' Seal to the back of the Summer Splash rectangle. Adhere the rectangle to the front of the card so it is centered on the corrugated Crushed Curry piece.
-
Mount the "life's detours are better with you" sentiment from the Tags To Go Set on Block B. Ink it up with the Crushed Curry Ink Pad. Stamp it on one end of the vertical white strip, leaving room to punch it out.
-
Unlock the Labeled With Love Punch. Hold the punch upside down so you can see the punching area. Slide the stamped sentiment into the punch and get it centered in the punching area vertically. Punch.
-
Use Stampin' Dimensionals to adhere the sentiment punch out to the front of the card as shown so it is centered over the ribbon on the right side.
-
Cut a 3" piece of the Summer Splash 3/8" Bordered Ribbon.
-
Slide one end of the ribbon under the ribbon already on the card front. Tie in place on the left edge with a half knot. Trim the ends.
-
Use the mini spatula on the Take Your Pick to carefully peel up one yellow pin marker sticker from the On The Go Puffy Stickers. Adhere it to the top of the sentiment punch out on the card front as shown.
-
Use the mini spatula on the Take Your Pick to carefully peel up one blue green arrow sticker from the On The Go Puffy Stickers. Adhere it to the bottom of the sentiment punch out on the card front as shown.