|
Traci Kendrick
https://tracikendrick.stampinup.net/ crafttime@myyahoo.com |
Twisted Ribbon Technique |
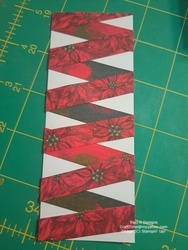
T his is just a quick sheet to document the twisted ribbon technique. This can then be added to the front of your project.
Project Recipe:
-
Materials
2" x 5 1/4" White Cardstock (CS)
1/2" x 2 1/2" Strips of DSP (5 for back of ribbon and 6 for the front) -
Measure and mark the CS to ensure consistency between the ribbons.
On the left-hand side mark at 1/2", 1 1/2", 2 1/2", 3 1/2" & 4 1/2".
On the right-hand side, mark at 1", 2", 3", & 4".
-
Starting with the reverse side of the ribbon. Glue the first strip angled down from the 1/2" mark to the 1" mark. Allow the strips to overhang the cardstock. Glue the second strip down from the 1 1/2" mark to the 2" mark. Continue all the way down.
-
The front of the ribbon is done much like the reverse side. Starting at the bottom, glue the first strip down at the 4 1/2" mark and angle up to the 4" mark. Working your way up the cardstock.
-
Now that all the strips have been attached, allow the glue to completely dry. Once it is dry, turn it over and trim all the ends off. You will end up with clean edges all the way around.
-
Here are two cards made with a twisted ribbon accent. Have fun and get creative with this technique!