

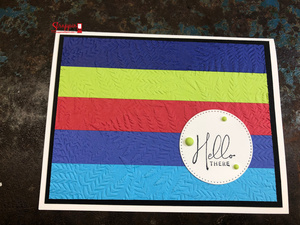
T his card is a way to use all the new In-Colors in one card. I used the new Ferns embossing folder to add interest to the card front.
Project Recipe
Card Base: Cut Basic White 8 ½ X 11 paper in half widthwise. You now have two pieces 8 ½ X 5 ½ Fold one of the pieces in half lengthwise for your card front. The card front now measures 4 ¼ X 5 ½.
Card Mat: Cut Basic White 3 ¾ X 5. Cut Basic Black 4 X 5 ¼.
Card Front: Cut a strip of each 2022-2024 In-Colors ¾ X 5.
Attach each strip to the card mat. These strips will completely cover the card mat. Emboss this piece with the Fern 3D embossing folder. Attach this emboss piece to the black card mat. Attach this matted embossed piece to the Basic White card base.
Die cut circle from Basic White with the Stylish Shapes Dies. Stamp sentiment from Nature’s Prints Stamp set with black ink. Attach this stamped image to the card front. Add three 2022-2024 In-Color Matte Decorative Dots.

Emboss your envelope flap with the Fern 3D embossing folder.
Supplies
| Name | |||
|---|---|---|---|
| Tuxedo Black Memento Ink Pad | have it | want it | Buy It |
| Nature’s Prints stamp set | |||
| Basic Black 8-1/2" X 11" Cardstock | have it | want it | Buy It |
| Basic White 8 1/2" X 11" Cardstock | have it | want it | Buy It |
| Sweet Sorbet 8 1/2 X 11 card stock | |||
| Parakeet Party 8 1/2 X 11 cardstock | |||
| Tahitian Tide 8 1/2 X 11 cardstock | |||
| Starry Sky 8 1/2 X 11 card stock | |||
| Orchid Oasis 8 1/2 X 11 card stock | |||
| Ferns 3D embossing folder | |||
| Stylish Shapes dies | |||
| 2022-2024 In Color Matte Decorative Dots | |||
| Basic White Medium Envelopes | have it | want it | Buy It |