

P
etal Passion is my very favorite suite from the new Occasions Catalog!!
This card also features a few of the FREE products from Sale-A-Bration (SAB)!
I have also pulled from my stash!!
Project Recipe
LIST OF PAPER:
Peekaboo Peach 1 sheet cut in half
Island Indigo 1/2 Sheet
Wisteria Wonder 1/2 Sheet
Night of Navy 1/2 Sheet
Whisper White 3 & 1/2 Sheets
Petal Passion Designer Series Paper (DSP)
Silver Foil Sheet
Copper Foil sheet
Red Glimmer Paper

BASIC CARD CONSTRUCTION:
1. Fold a piece of colored cardstock in half and burnish with a bone folder.
2. Cut a piece of Petal Passion DSP to 4 x 5 1/4" and glue with Fast Fuse.
3. Cut 6 pieces of Whisper White cardstock to 4 x 5 1/4" for the inside of your cards.
4. Stamp the "Get your happy on" stamp on each in Memento Tuxedo Black Ink. Add accents of Wink of Stella or Silver Gel Pen as you like.
5. Next glue to the inside with Fast Fuse.

EMBELLISHMENTS:
1. Using Whisper White and Memento Tuxedo Black Ink, stamp the flowers and bird from the Petal Pallet set. I did this 3 times for 3 of my cards.
2. Using Stampin Blends or other alcohol markers, color the three sets.
3. Once dry, use Wink of Stella to add shimmer to only the flowers. Add a Black Nuvo Drop to the eye on the bird.
4. Use the petals & More Thinlits dies and your Big Shot to cut out these pieces.
5. For the other 3 cards, I used various flowers from the Petal Passion DSP and alcohol markers to color three different flower combinations.
6. Fussy cut them out.... (If you are going to give them as a set, you might want to use a variety of different colors as I did. If not, you could make all your cards the same color - whatever you like!)
FINISHING ASSEMBLY:
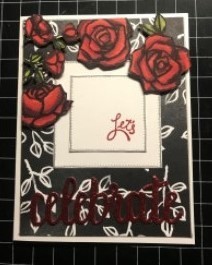
1. Die cut the word Celebrate from the Silver and Copper Mirror as well as the Red Glitter cardstocks.
2. Glue to the bottom of the card front using Liquid Glue.
3. Die cut from whisper White 6 ea. 2 1/4" stitched squares and 6 ea. 1 1/2" stitched squares.
4. Using the "Let's" stamp from the Amazing You SAB stamp set and coordinating ink with your card base cardstock, stamp the sentiment in the bottom right corner of the smaller square.
5. At your choosing, add Wink of Stella, Silver Gel Pen, or Glaze Pen to both size squares.
6. Glue the largest square to the card front with Fast Fuse just above the Celebrate die cut.
7. Glue the smaller square to the large one either towards the bottom right or in the middle towards the right side.
8. Add dimensionals to the other flower elements and bird. Arrange them on the left and top area of your card front as you like BEFORE removing the backing on the dimensionals. Once you are happy peel the backing and stick to your card.
And you are done!! Now this would not be nearly as large a task if you want to make just one card.......
Happy Stamping!
Tami E.