
P retty card perfect for lots of occasions using Stampin' Up! products and a stamp set that can be earned for FREE during Sale-A-Bration 2020.
Project Recipe
Cut cardstock and designer paper pieces to the following sizes using a Paper Trimmer:
- card from Rich Razzleberry Cardstock at 5-1/2" x 8-1/2" and scored at 4-1/4"
- 4" x 5-1/4" from Poppy Parade Cardstock
- 3-7/8" x 5-1/8"" from Whisper White Cardstock
- 1-3/4" x 3-7/8" of red poppies, green leaves, and purple berries on mottled light blue background design from Peaceful Poppies Designer Series Paper
- 1" x 4-1/4" from Basic Black Cardstock
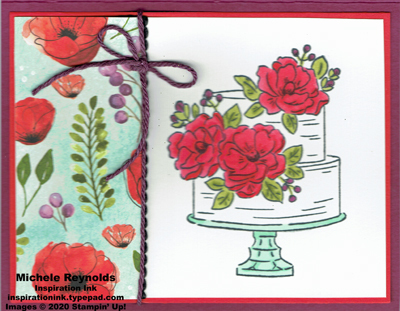
Mount the cake with flowers image from the Happy Birthday To You Set on Block E. Ink it up with the Memento Ink Pad. Stamp it on the right side of the horizontal white rectangle so the right side of the cake is about 1/2" from the right side of the cardstock and it is centered top to bottom.
Make sure you have some paper (Grid Paper works great) at your work space.to protect the work surface. The Stampin' Blends Markers will bleed through the cardstock that you are coloring so you need to protect your work surface.
Place the stamped cake rectangle on the work paper and start coloring with the Stampin' Blends Markers. The markers have a brush tip for coloring in larger areas and a fine tip for coloring in smaller areas. Work on one area at a time so the inks will be wet and will blend easier.
Use the Dark and Light Poppy Parade Markers to color in the flowers.
Use the Dark and Light Old Olive Markers to color in the leaves.
Use the Dark Rich Razzleberry Marker and the Light Blackberry Bliss Marker to color in the berries.
Use the Dark and Light Pool Party Markers to color in the cake stand.
Leave the cake white.
Use the Color Lifter Marker to remove any excess color as needed.
Unlock the Decorative Ribbon Border Punch. Slide one long side of the Basic Black strip into the punch so it butts up against the guide at the back of the punch. Punch. Slide the punched cardstock over a little bit and line up the punched area with the silver design printed on the base of the punch. Punch again. Repeat as necessary until the entire length has been punched.
Tip: I sometimes find it easier to line things up with this punch if I turn the punch over so I can see the punching area. I then line up the punched areas with the designs of the punch before punching again.
Using SNAIL Adhesive, adhere the punched Basic Black strip to the back of the piece of Peaceful Poppies Designer Paper so only the tops of the little bumps show along the right 3-7/8" edge of the designer paper.
Adhere the designer paper with punched strip attached to the left side of the stamped and colored cake white rectangle. Trim off excess black cardstock as needed using Paper Snips.
Adhere the white rectangle with designer paper attached to the Poppy Parade rectangle.
Cut a 4-1/2" piece of the Blackberry Bliss twine from the Nature's Twine.
Lay the ribbon across the matted white/designer paper rectangle so it covers the seam between the designer paper and the punched black strip. Secure in place on the back with strips of Tear & Tape Adhesive.
Remove the protective backings from the Tear & Tape pieces and add SNAIL to the back of the Poppy Parade rectangle. Adhere the rectangle to the front of the Rich Razzleberry card.
Cut an 8" piece of the Blackberry Bliss twine from the Nature's Twine.
Tie a small bow in the center of the twine. Trim the ends.
Use a Mini Glue Dot to adhere the bow to the front of the card at a slight angle near the top of the twine already on the card.