

T
his is a shutter fold card that uses Stampin' UP! Gilded Autumn paper and the Beautiful Autumn bundle as well as a sentiment from Peaceful Moments.
I have a lot of pictures so this is a long tutorial but not complicated. I hope you enjoy it and will give this style a try. For more of my tutorials you can visit my blog at GreenThumbStampers.com and sign up for my newsletter where I have exclusive access to all of them. You can also find Green Thumb Stampers on Facebook, Pinterest and YouTube! Check them out for videos and more creations.
Project Recipe

This card is basically a gate fold card with a twist. You will start with a base that is 8 1/2 x 5 1/2"
Score on the long edge at 2 1/8", give it a turn and score again at 2 1/8 at the other end.

Fold those pieces in to the middle and make sure they line up good. Burnish the folds.

Next, decorate the outside pieces.
I layered mine but you can also just do the designer series paper right onto the base.
Layer each flap with a piece that measures 2 x 5 3/8"

When they are both done, you can put the DSP on top of that.

Mine has the right side done with one piece of paper measuring 1 7/8 x 5 1/4"
The left side I used two different pieces to cover it. That side measures 1 1/8 x 5 1/4"
and
the second piece is 3/4 x 5 1/4"

Let's move to the inside now.
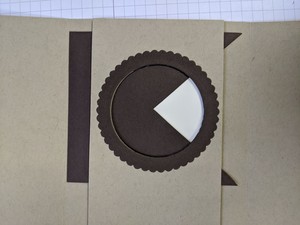
You will have a piece that goes down the center that measures 3 x 5 1/2".
Using a large circle punch, or in this case a die that measured edge to edge about 2 3/4", cut a circle in this paper.
You will want to make sure to cut it down a ways from the top so you have room for dimensionals up there and the shutter pieces to slide through the back.
I also used the circle die and a larger scalloped circle to make a piece to add to the front to jazz it up. You could also use DSP here as well.

For this next step, you could put a full layer of paper on the back portion of the inside but I just wanted the shutter part to have the very vanilla color. So you could layer the whole back at 4 x 5 1/4" or....
cut a piece of very vanilla cardstock that is 2 7/8" wide by about 3 1/2" long. This will ensure you cover the hole.
Put adhesive on the back of this piece.
Now hold the vanilla piece behind your piece with the hole so you have it spaced where you want it. Then line them up over the inside of the card leaving the same amount of room along both sides. Press it down so the vanilla piece sticks. I know, sorta rough directions but it works and hopefully is easy to understand.
Your vanilla piece is now stuck to the card.
**note** You could stamp your sentiment now but I waited until I had my shutter finished to know exactly how much space I had and to make sure it was in the center.

So now you can glue the scalloped circle onto the front of the piece with the hole in it.
Flip the piece over then and add some dimensionals to the back.
You want your top ones to be really close to the edge (I had to move these after I took this pictuere) and small so you have room for your shutters to slide through underneath.
The dimensionals on the bottom can be bigger and more of them because the shutter pieces are only 3 1/2" long.
Go ahead and stick this to the inside of the card. Make sure to leave equal amounts of space on each side of this piece to the score lines.

Let's move on to the shutters.
These pieces measure 3 1/2" tall x 4" wide.
You need two of them.
Score each one on the long edge at 1/2"
Burnish that score line so it will fold under.

Next you are going to need to make a dot in the center of the shutter paper.
I saw someone showed using the grid paper. My photo has it sitting on the paper.
The center along the bottom is 2" and along the sides is 1 3/4"
So....take your ruler and place it across the cardstock at the 1 3/4" line on the grid paper, then use your pencil and make a mark at the 2" ruler mark on the cardstock.

Now, from your center dot, use your ruler and draw a line to the outside corner.
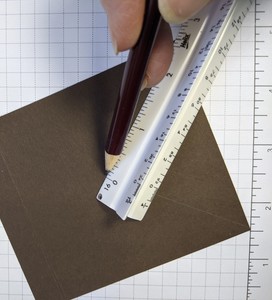
Repeat the last step and draw the line to the other corner.

Use your scissors and cut on your lines, up to the center dot. This is going to make your shutter panel.

It will look like this.
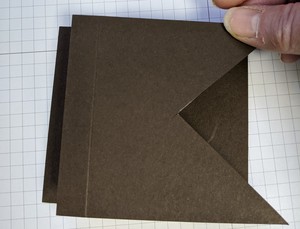
Now to help speed things along for you, lay this panel on top of the uncut panel. Make sure the score lines are on the same side.

Cut along the edges and the two panels should be the same!!
Let's begin assembling these pieces.
Take one of the shutter panels and slide it under the piece you popped up with the hole in it.
Make sure the

Put your strong adhesive along the 1/2" part where you scored. You can use the liquid glue, Tear n Tape or the Stampin' Seal +, just make sure it's strong to hold it in place.

Close the panel down on top of the glue.
This is where the mountain fold comes in handy because of the way this piece glues down to make it move.
You can also take a second to nip off the points of the shutter panel that are poking out under the center piece. It will just help keep it from getting bent up and possibly being noticed.

On the other side of the card you want to slide the shutter panel in and have it go UNDER the first one you put on.
This panel you will want to make sure it is lined up with the first one and not sticking out on one side or another.
I also used the first panel as my guide to make sure my cuts were sort of centered together as well.

This side you will want to do the same for gluing. Make sure that it is lined up with your hole but not fully up against the score line.
Add your strong adhesive to the 1/2" part that will be sticking to the front flap.

Close the flap onto the shutter panel.

Your pieces should now move in and out when you open it.
Now is when I stamped my words inside.

I opened the card all the way up and then made sure the sentiment I was going to use was going to fit.
Once I made sure I inked 'er up and stamped it!
.jpg?1602080143)
That completed the inside.
If you were using DSP you might be done. Since I wanted a little more pizzazz inside I added some decoration.
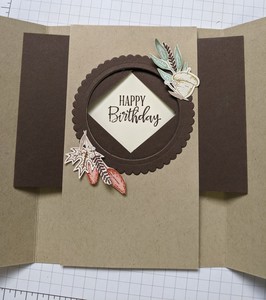
I fussy cut some of the sprigs from the Gilded Autumn paper as well as using the punches from the Beautiful Autumn bundle. They coordinate with the paper!!
I just layerd them on the scalloped circle and added a touch of linen thread.
My inside now is complete.

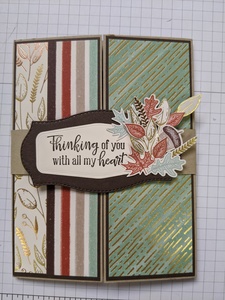
For my outside portion you could cut a couple of circle or rectangles if you don't have dies.
I used a couple of dies and layered them.
I stamped my greeting to the left of the very vanilla die so that I would have more room for my decoration.

I glued those together and then just built up a decorative looking arrangement of the punched leaves and a few that I fussy cut. I again added a bow to finish it off.
.jpg?1602080143)
My original plan was to glue this layer onto the left front panel of the card and have it open with the card.
I saw where someone had made a belly band for theirs so I ended up doing that as well.
To do that I had a strip of coordinating cardstock that was 1" wide and 9" long.
I skipped the scoring of this piece and just laid my card on it and folded the pieces up onto the top of the card. I glued the ends together and that made the belly band.
After that I used strong adhesive and stuck the die cut layer to the belly band.
That completes this tutorial. If I left something out or you have questions just let me know! I know this is a long one, but it's just because I had so many pictures to show you!!! Have a great day! I hope you give this card a try.